Bentley Raceway and Cable Management CONNECT Edition Help

Equipment Properties

The Equipment Properties function enables you to modify existing equipment objects in your current design file. All information regarding IDs, cable connections etc. will be preserved, even when replacing the existing equipment object with another equipment definition.

Accessed from:
  • Equipment & Cable Ribbon > Equipment Tool Group
To modify the properties for an equipment component, select the Equipment Properties icon, then select the component in the model to 
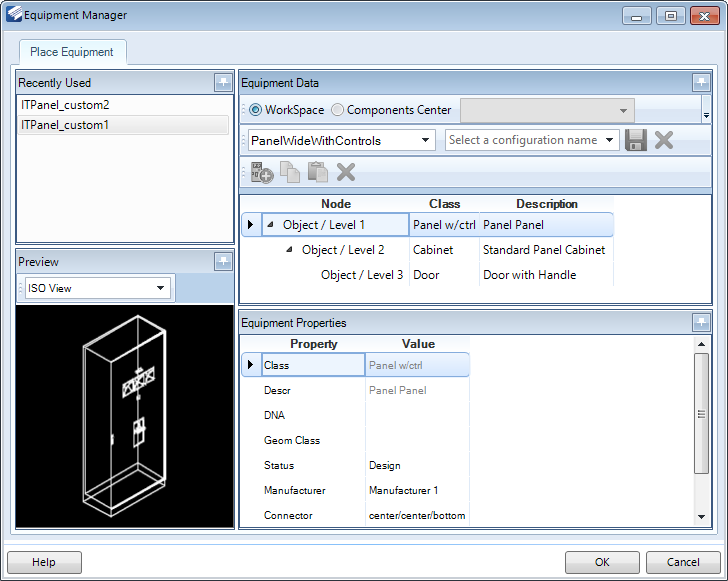
display the following dialog:
Note: This dialog is a modified version of the Equipment Manager dialog with only the Place Equipment tab visible:
The dialog is divided into the following different sections:
  • Recently Used: This pane lists the most recently placed equipment components (as shown below).
  • Preview: Provides a preview of the equipment component in either a Top, Front or Iso view.
  • Equipment Data: Breaks down the Equipment component into sub-levels, each of which has it's own set of properties which can be defined.
  • Equipment Properties: Provides a list of properties related to the Equipment Object selected in the Equipment Data section.
Select an equipment component from the drop down list in the Equipment Data section to load the properties in the Equipment Properties section.

Equipment Data

SettingDescription
WorkSpace When selected the Equipment list would represent content found in the dgnlib files of the active local WorkSpace.
Components Center When components are placed from the Components Center, this option is selected and the properties for the component are displayed.
The UDAs which display for a given category of components in the Equipment Manager come from the ComponentsCenterUDA.xml file stored in the WorkSpace dataset folder like the example below:

..\Workspaces\BRCM Imperial Example\Standards\BRCM\std_dataset\equipment

The Components Center Category maps to the Descr property in the Equipment Manager.

Equipment List Select the equipment component to place from the list.
Configuration You can create a new configuration from an existing equipment component and save it. Type the configuration name into the field and click the Save icon, which only enables when a value is entered into the field.
Add Adds a new sub-level o the same type as selected under the main Object node. This option is not available when the main (Level 1) object node is selected.
Note: This option is also available from the right-click menu.
Copy Allows you to copy the selected object which can then be pasted either under the same object node it was copied from, adding another object of the same type, or pasted under a different node if needed.
Note: This option is also available from the right-click menu.
Paste Pastes the copied object under the selected node.
Note: This option is also available from the right-click menu.
Delete Deletes the selected object. You will be prompted to confirm the deletion process.
Note: This option is also available from the right-click menu.
OK Saves the changes and closes the dialog.
Cancel Closes the dialog without saving the changes.

Equipment Properties

The Equipment Properties section displays property values which can be defined. The properties which display are directly related to the type of Object which is selected. Some equipment components will only have the single Object/Level, while others will have multiple levels to define. Having more object levels provides a better capability to customize and reuse a component for a project.
Note: Additional levels can be added to any of the sub-levels, but not the main Object/Level 1 level.
SettingDescription
Object/Level 1 Level 1 will usually contain some basic component information such as shown below:

To define/edit the value for a property, either enter a new value directly into the field, or select a value from the drop down list if one is available.

Object/Level 2 Level 2 properties will usually define the dimensional parameters of the component:

When defining dimension parameters for an equipment component, the distance values can be either entered directly into the field, or you can click the Browse icon and use the mouse to click a start and end point on the component to define the parameters (such as Width, Height and Depth).

Object/Level 3 Level 3 properties will usually define an attribute specific to the component:

Rearranging the Equipment Manager View

In the upper right corner of each section of the Equipment Manager, there is an icon which will unpin the section and hide it on the left side of the dialog as shown:

Click on the tab to display the section, and click somewhere off of the section to hide it.

To dock a section, click the tab and click the title bar drag the section to the desired location by dropping it onto one of the directional arrows that display.
Key-in: RCMEQPPROPERTIES